Quickstart
Get Relier running in under 5 minutes.
1. Install Relier
pip install vs. contributing from source
This guide covers the pip install path, which is the right choice for adding Relier to your own project. If you're contributing to Relier itself, clone the repo and run make setup instead. The make worker / make dev shortcuts only exist in the cloned repo; pip users start workers with the celery command directly (shown in Step 6).
2. Start Redis
Relier needs Redis with persistence enabled. The quickest way locally is Docker:
Why persistence?
The --appendonly yes flag enables Redis AOF persistence. Without it, a Redis restart drops every heartbeat and payload Relier has stored, breaking the zero-job-loss guarantee. See Deployment for production Redis setup.
3. Configure Relier
Create a .env file in your project root:
That's the only required setting. Everything else has sensible defaults.
4. Define your first reliable task
# tasks.py
import asyncio
from relier import rl_task

@rl_task(
    queue="default",
    idempotent=True,           # same invoice_id → never runs twice
    soft_timeout=25,           # cleanup hook fires at 25s
    hard_timeout=30,           # forcefully terminates runaway execution at 30s
)
async def send_invoice(invoice_id: str) -> dict:
    """Send an invoice: safe to retry, never double-charges."""
    await asyncio.sleep(1)   # ← replace with your actual work: Stripe, DB write, email
    return {"charged": True, "invoice_id": invoice_id}
This example runs immediately: no external services needed
asyncio.sleep(1) is a stand-in. Replace it with your actual logic once the worker is running. For ready-to-copy real-world shapes (Stripe, database writes, HTTP calls) see the Integration Recipes.
New to async?
Relier tasks are async def functions. If your existing Celery tasks are regular def functions, Relier supports those too: just drop the async keyword. The async bridge is handled for you either way.
Returning results
Tasks return values like any Python function:
async def send_invoice(invoice_id: str) -> dict:
    ...
    return {"charged": True, "invoice_id": invoice_id}
When idempotent=True, Relier automatically caches that return value. If the same invoice_id arrives again (retry, webhook re-delivery, duplicate dispatch), the cached result is returned immediately without re-running the function.
Most users never need to manage results manually. Manual result control with idempotency_lock is only needed when the key Relier would derive from arguments isn't the right one, for example, when a webhook event_id is more stable than the full payload hash. See Patterns Cookbook → Pattern 2.
5. Dispatch tasks
Relier has two dispatch methods on every @rl_task. Pick the one that
matches your call site.
# FastAPI / Starlette / async Django use apush
from fastapi import FastAPI
from tasks import send_invoice

app = FastAPI()

@app.post("/invoices/{invoice_id}/send")
async def dispatch_invoice(invoice_id: str):
    await send_invoice.apush(invoice_id)   # async dispatch
    return {"status": "queued"}
# Flask / classic Django / scripts / management commands use push
from flask import Flask
from tasks import send_invoice

app = Flask(__name__)

@app.post("/invoices/<invoice_id>/send")
def dispatch_invoice(invoice_id):
    send_invoice.push(invoice_id)           # sync dispatch
    return {"status": "queued"}, 202
Both run the same reliability stack, admission control, schema envelope, OTel context and both are fire-and-forget (they return as soon as the broker has the task).
Don't call .delay() or .apply_async() on a @rl_task
Those are Celery's native dispatch methods. They bypass Relier's admission
control and skip the signed envelope, so the worker accepts the payload as
a legacy unsigned message. Always use apush (async) or push (sync).
See API reference → Dispatch methods.
6. Start the worker
Installed via pip (your own project)
Open two terminals. Start these in the directory that contains your tasks.py.
Terminal 1: Celery worker:
celery -A relier.tasks.app worker -l info -Q high_priority,default,low_priority,re-queue --include=tasks --pool=solo
--pool=solo is required on Windows. Celery's default prefork pool uses named pipes for IPC that are unreliable under Windows' spawn-based multiprocessing, causing workers to crash with OSError: [WinError 6] on task receipt. solo runs everything in the main process and works correctly with Relier's async task execution.
Terminal 2: Phoenix resurrector:
Why two processes?
The Celery worker executes tasks. Every worker also embeds the Phoenix resurrection scanner on its own event loop, so if one worker dies, the survivors detect its expired heartbeats and re-queue the orphaned tasks automatically — distributed locks make running many scanners side by side safe. rl run-resurrector runs that same scan loop in a standalone process. You don't strictly need it for partial failures, but it covers the one case the embedded scanners can't: all workers dying at once, when there's no surviving worker left to scan. Running it as a separate failure domain is recommended for production so recovery is already in flight the moment workers return.
Workers must import your task modules
Relier wraps Celery's worker entry system, it does not replace it. You must provide a module that imports your task definitions so Celery registers them at startup.
The simplest way is --include:
- Tasks in
tasks.py→--include=tasks - Tasks in
myapp/tasks.py→--include=myapp.tasks
Without this, the worker boots silently but logs Received unregistered task of type '...' when a task arrives and discards it. This is the most common first-time setup issue.
For production, create a dedicated entry-point module instead:
# worker_app.py
from relier.tasks.app import celery_app  # Relier's configured Celery app
import tasks                              # registers your @rl_task functions
import myapp.tasks                        # add more modules as needed
Then run: celery -A worker_app worker -l info -Q ... (no --include needed).
What celery -A relier.tasks.app means: "start a worker using Relier's Celery app". Relier's app is what wires up Phoenix, DLQ, idempotency, and the async bridge. Do not substitute a custom Celery(...) instance; Relier's guarantees only work through its own app.
Module name, not file path
Celery's -A flag takes a Python module name, not a file path:
Avoid running python tasks.py directly
If you execute python tasks.py as a script, Celery names your tasks __main__.send_invoice instead of tasks.send_invoice. The worker won't recognise the name and will reject the task. Always route tasks through the Celery worker command above.
Cloned from source (contributing / dev)
make worker starts the Relier infrastructure (heartbeats, Phoenix, graceful shutdown) against the library itself; there are no user task modules to import in this context. It runs the same celery -A relier.tasks.app worker command without --include, which is correct for the repo's own use.
Or the full Docker dev stack (Redis + workers + resurrector + OTel/Grafana):
Production HA stack (Sentinel + replicas + backup sidecar):
All deployment options are documented in Deployment.
7. Verify everything is working
# Check that Redis and Docker are healthy
rl doctor

# See what's running right now
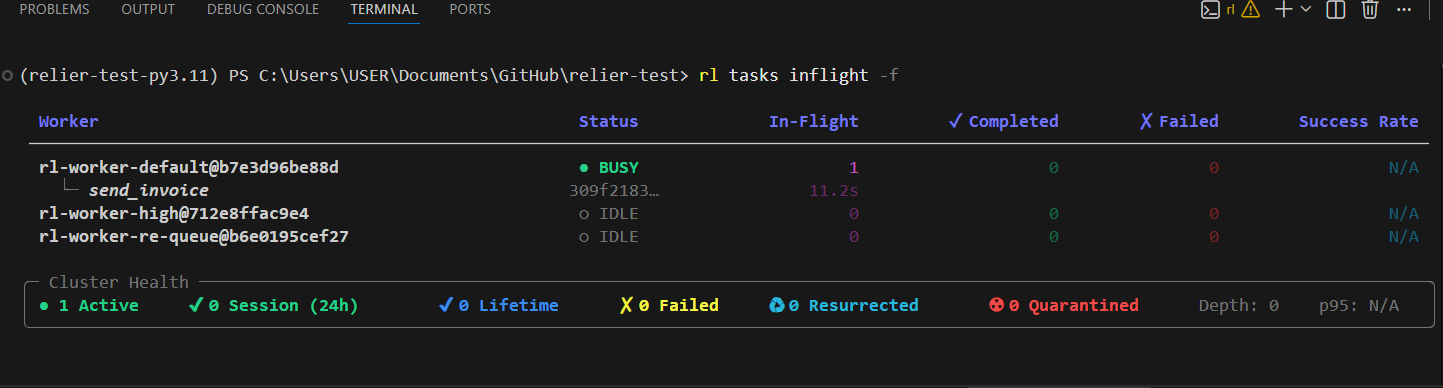
rl tasks inflight

# Check your SLO burn rate
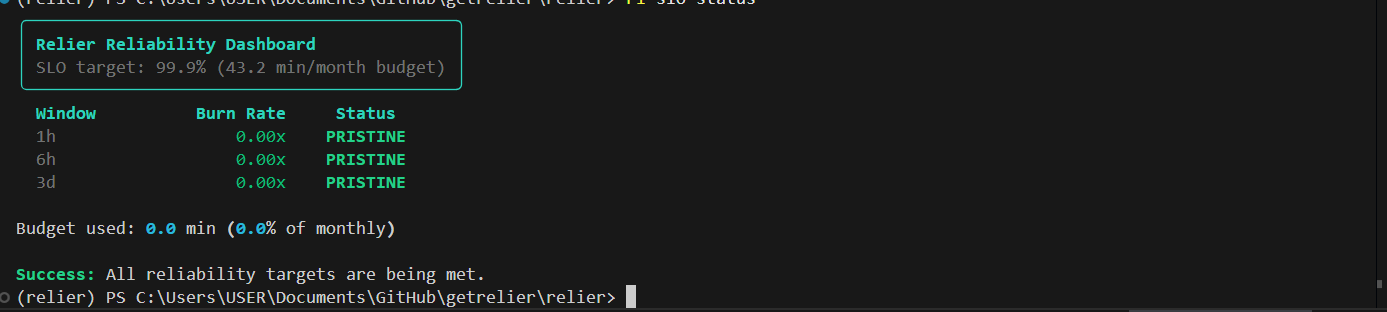
rl slo status
rl doctor — connectivity and configuration check:

rl tasks inflight — live view of workers and in-flight tasks:
rl slo status — SLO burn rate across 1h / 6h / 3d windows:
What just happened?
When you called await send_invoice.apush(invoice_id):
- Admission check: Relier verified the cluster isn't overloaded.
- Schema wrapping: the payload was signed with a checksum and versioned.
- Dispatch: sent to the Redis broker with the original
invoice_id.
When a Celery worker picked it up:
- Checksum verified: payload integrity confirmed before execution.
- Idempotency claimed: only one worker can run this invoice_id at a time.
- Heartbeat registered: Phoenix starts watching this task.
- Your function ran:
send_invoice("INV-123")executed. - Result cached: if this exact invoice_id is retried, Relier returns the cached result without re-running.
- Heartbeat cleared: Phoenix knows the task completed cleanly.
What happens when a worker dies?
With your worker and resurrector both running, dispatch a task and then kill the
worker process (Ctrl+C or kill <pid>). Within about 12 seconds you'll see
the resurrector log:
PHOENIX Resurrector initializing...
[23:17:12] INFO     Initialising loop-local Relier Redis connection pool. [loop=2239067885072 -> redis://***@localhost:6379/0]
           INFO     Redis connectivity verified.
[23:21:05] WARNING  Worker death detected; replaying orphaned task.  task_id='1cb7407c-88ae-47b1-b3f5-83ad36d31116'
                    task_name='tasks.send_invoice'  attempt=1  max_attempts=5  ghost_worker='rl-worker-default@b7e3d96be88d'  queue='default'
                    has_checkpoint=False
           INFO     Acquired resurrection lease  task_id='1cb7407c-88ae-47b1-b3f5-83ad36d31116'
                    lease_key='rl:lease:{1cb7407c-88ae-47b1-b3f5-83ad36d31116}'  lease_ttl=180
           INFO     Submitting resurrected task to broker.  task_id='1cb7407c-88ae-47b1-b3f5-83ad36d31116'  task_name='tasks.send_invoice'
                    queue='default'
           INFO     Phoenix recovered 1 orphaned task(s) onto healthy workers  resurrected=1  monitored=0  duration_ms=62
           INFO     Resurrected task successfully re-queued.  task_id='1cb7407c-88ae-47b1-b3f5-83ad36d31116'  task_name='tasks.send_invoice'
The task completes on a healthy worker. No data loss, no duplicate execution (idempotency blocks the re-run from charging twice), no manual intervention.
That guarantee holds whether the worker was killed by OOM, a deploy SIGTERM, a
kernel panic, or a kill -9. Phoenix detects the missed heartbeat and acts.
Where these logs come from — and rl run-resurrector is optional
Every worker embeds this same scanner, so in a multi-worker cluster a
surviving worker detects the death and re-queues the task on its own —
printing these exact lines to its own console (as structured JSON at INFO,
rather than the colorized form rl run-resurrector renders above; set
RELIER_LOG_LEVEL=DEBUG for the colorized form). No extra config is needed
to "turn on" resurrection logging — it rides the standard logger.
The demo runs the standalone resurrector because killing your only worker leaves nothing behind to scan. In production it's the guard for the one case the embedded scanners can't cover — all workers dying at once — so it's recommended but not required.
To verify the full failure surface (network partitions, load spikes, payload corruption), the repo ships a first-party chaos suite:
Chaos requires the Docker dev stack
rl chaos commands use docker kill to terminate worker containers. They only work when the stack is running via make dev in the cloned repo. pip install users can still run scenarios that don't need Docker kills (load-spike, slow-task, task-corrupt); see the Chaos Guide for the breakdown.
Relier's production runtime ships entirely via pip install. The chaos suite is
part of the development harness for contributors and teams that want to stress-test
their own cluster. See the Chaos Guide for the full setup.
Next steps
- Never used Celery before? Celery Primer: the basics in five minutes.
- Core Concepts: understand why Relier works the way it does.
- Integration Recipes: FastAPI, Flask, Django, scripts.
- Patterns Cookbook: copy-paste shapes for common cases, including
manual idempotency control with
idempotency_lockwhen you need a custom key. - Troubleshooting & FAQ: first place to look when something breaks.
- API Reference: all
@rl_taskparameters explained. - Configuration: tune timeouts, pool sizes, admission control, and more.